Friday, 10 August 2012

My two favourite under-eye concealers: Clinique Airbrush Concealer & Mac Moisture Cover

Mac Moisturecover Concealer in NC35 and Clinique Airbrush Concealer in Medium 02

These two concealers have really been my favourites for the past few months. Concealers, no matter what concealer, crease into the lines under my eyes within a matter of seconds. The Bobbi Brown Creamy Concealer, the Collection 2000 Lasting Perfection, you name it, it creases. Its not the fault of the concealer, it's simply my eyes! (Boo!)

However, I've found a way that works for me to use concealer (I will explain more further on) and if you have troubles with creasing concealer then you may like to try this also.


Clinique Airbrush Concealer in Medium 02
This Clinique concealer was recommended on a video by Lisa Eldridge, the most amazing make-up artist in the world - really. It is 'light-reflective' one which means if you use it on the areas you are dark, it brightens and conceals them, light reflects off of the concealer making you look brighter and fresher under the eye.

I had never tried one of these light reflective ones before, but this one really does work! There are also good ones by Maybelline and Rimmel that you can pick up in the drugstore. 

-

The first thing I tackle when I am doing my concealer work is the darkness under my eyes, I'm talking about the circles/bags that form underneath the eye. I don't get close to the lash line at all because if you think about it, you don't need to conceal here. Foundation will take care of any discolouration if you have fairly normal eyes. If you have an extremely dark eye area then this method may not be for you.

So looking at the circle underneath, I use my Clinique Airbrush Concealer to conceal only the dark area. So by now I have a pink crescent shaped line going from the side of my nose to below my eye. Applying the product to the circle only. I then blend this out with my finger, and the dark circle has been concealed only where it needs to be and is relatively invisible. By only concealing the dark circle you are giving yourself coverage where you need it. Putting on loads of this light-reflective concealer under the whole of your eye, from the corner up to the lash line and over your dark circles, you are highlighting the dark circle more and creating a reverse effect. I hope this makes sense!

Mac Moisturecover Concealer in NC35
I've always had love hate relationships with my Mac concealers, but I can't fault the Moisturecover, its perfect for what I need.

As far as Mac concealers go I've bought and tried the Studio Finish, the Pro-longwear, the Select cover-up (which I currently use for blemishes and redness) and the Moisturecover. I do like the Select-cover up, it's so heavy duty you only need a tiny bit, but I just can't put concealers like that under my eyes.

-

The reason why I decided to pick up this concealer at Mac was because it provides moisture to the eye as well as concealing. I always use eye cream before make-up anyway, but heavy concealers tend to be quite drying on my under-eye area and start to look scaly no matter how moisturised my eyes are.

This concealer is so, so lightweight and silky. It doesn't feel heavy in the slightest and instead of looking dry it looks really radiant and glowing - something that will make you look healthy and awake! 

-

I use this concealer after the Clinique and I use it on my cheekbone directly underneath my eyes, so kind of overlapping the concealer work I have just done. I dot it along the bone all the way out to where my eye stops. I then blend this out using my Mac 130 stippling brush or my finger. This concealer helps to give me that bright-eyed look and I sometimes draw a triangle with it and blend it out if I really want that Kim Kardashian illuminated look! This method works really great for me and because I am avoiding the direct space under my eyes and near my lash line, the concealer doesn't crease and the concealer is really targeted to just my dark points. The science of concealer, eh?

-

This concealer is definitely moisturising, so if you have particularly dry skin you may like this. I have this in NC35 although I am currently an NC42. Surprisingly, it's not actually that much lighter than my skintone, I swatched it at the Mac counter before I bought it and it's the perfect shade to brighten, not accentuate. If you want to eliminate darkness under your eyes, never go too light with your concealer or you can reverse the effect, highlighting your darkness even more than without concealer. Slightly lighter is perfect and if you're unsure, ask an artist at the counter to help you pick out a perfect shade.

Overall, this is my favourite concealer for covering my under-eye darkness. By all means this is not a full coverage concealer, however for me it is just enough coverage. If you were looking to cover severe darkness or pigmentation, this concealer just wouldn't cut it. 

-

So those are my favourite concealers for under the eyes, I hope you enjoyed it! Please comment and let me know what you thought or if you found the tips & tricks useful! :-)

The Liebster Blog Award


Hello lovelies!

I do have some posts coming your way later on today - My two favourite under-eye concealers and a review of NARS' Amour blusher! So keep an eye out for those.

-

So, I was checking my emails just now and I had a message from the lovely Hermione at Hermione Lifestyle - check her blog out if you love Harry Potter and a little bit of everything! She is the sweetest.

She left a comment on my most recent post  saying that she had nominated me for the Liebster Award!


These are the rules:

1. Each person tagged must post 11 things about themselves.
2. They must also answer the 11 questions the ' tagger ' has set for them.
3. They must create 11 more questions to ask bloggers they have decided to tag.
4. They must then choose 11 bloggers with less than 200 followers and tag them in their post.
5. These lucky bloggers must then be told.
6. There's no tag backs

So here goes!!

-

11 things about myself:
  1. I have a dog called Chilly and he is almost 4 years (28 in dog years!)
  2. Most people think my hair is black but it's actually brown, theres just so much of it that it looks black!
  3. My favourite dinner is Salmon en Croute with mashed potatoes
  4. I used to be obsessed with Diet Coke before I found out it was worse than the full fat one!
  5. I have a boyfriend called Jake and we have been together for nearly 3 years! (Eek!)
  6. My Mum was born on the island of St.Vincent in the Caribbean and moved to England when she met my Dad
  7. I want hair like Lauren Conrad - long, healthy and thick!
  8. If I could get anyone to do my make-up for my wedding I would get Francois Nars, he is my hero
  9. When I was 7 I wrote and recorded a song about 911 called 'Why' (Haha cheesy, but 911 really interested and upset me)
  10. Sometimes I feel like giving up trying to find a job and just pop out some babies - I would enjoy that 100000000x more!
  11. I'm 18 and have already designed my wedding dress in my head
-

Hermione's 11 questions for me:


1) Which are your top 3 Blogs?

2) What do you want your life to be in 10 years?
I'd like to be married/settled with some beautiful babies and more dogs!

3) Day or Night?
Night


4) Who inspires you to do blogging?
All the blogs mentioned above! And lots of other people I follow. Also my passion for beauty and make-up inspires me

5) How would you describe yourself in 3 words?
Idealist
Positive
Loving

6) What is the best memory you have of your life so far?
My holiday to Turkey this year, it was amazing

7) Do you have a favourite clothing item? If so, what is it?
My leather jacket

8) Do you wish you got a letter from Hogwarts when you were 11 years old?
Yes and no - I did like Harry Potter a lot, but only for a brief time

9) Are you close to the rest of your family?
Yeah, all of them

10) If you could get one beauty item for free, what would it be?
Serum, because it's expensive!

11) Would you like to say anything specific to the people, who'll read you Blog-post now?
Hello! Thank-you for the comments and for loving the blog. And to Hermione thank-you for nominating me! This is fun!

-

My 11 questions for those I have tagged:

1. Why did you choose to start your blog?
2. What is your most essential beauty item/product?
3. Who's blog are you loving at the moment? (Pick 3)
4. If you could choose anyone, who would do your make-up for a special occasion?
5. What's your favourite dinner?
6. Is there anything you are looking forward to in the next few weeks?
7. Do you have any pets?
8. Are you a follower of my blog? (If not, click follow!)
9. What music/musician are you loving at the moment?
10. Who/what inspires you?
11. What is your biggest dream/ambition?

-

My 11 Nominees:


-

Those are my nominees! I will contact them all individually as quick as I can to notify them of the nomination! 
I think this is such a great idea for bloggers who are really struggling to get followers or recognition for their work! I hope by nominating those blogs I can get them some traffic and it's a fun tagging game for all
:-)


Tuesday, 7 August 2012

Perfectly Polished: The Invisible Pedicure


Yes, that is a picture of my feet. Yes, they are fat. And no, I don't care if you are eating your dinner - my feet mare perfectly fine (haha!)

After reading the article 'The Invisible Pedicure' in Vogue, it really inspired me to go back to my old faithful pedicure trick - the standard top coat.


I always just used to slap on some top coat and be done with my toenails, and I don't know why I stopped doing it! It is so easy and quick if you're in a hurry or you're wearing sandals or peep-toes and you know you haven't painted your nails. Just grab a nail file, shape them nicely and paint on one or two coats of clear polish - done!

Theres something about a shiny nail that just makes you look so polished and neat. So if you're feeling too lazy to do your own pedicure and strapped for cash for a salon visit, just rummage through your nail polish stash and put your clear coat to good use.

You can even use a nail base underneath like O.P.I Nail Envy to ensure your nails stay healthy and strong, then go in with a clear coat on top!

As you can see from the article, this bare nailed trend has become popular on the runway and lots of models have been sporting this fab invisible pedicure.


Revlon Nail Enamel Top Speed Top Coat - £6.49

This Revlon one is the nail polish I used for the photo above and is recommended in the article too! It's a great mid-priced nail polish that does the job and gives at least 3 days flake free wear.


Dior Top Coat - £14.50

This Dior polish is another one mentioned in the article, and I think I'll try and get my hands on this when I use up all my Revlon as it's got a lovely wide brush so application will be even quicker! This will hopefully be longer wearing than the Revlon as it is a higher-end brand.

-

What nail polish are you currently sporting on your toes? 
Are you a fan of the invisible pedicure?
I'd love to hear your opinions so don't be afraid to comment!

Hope you enjoyed the post!

Monday, 6 August 2012

Laura Mercier - Translucent Loose Setting Powder, Oil-free Foundation Primer


Laura Mercier Translucent Loose Setting Powder and Oil-Free Foundation Primer


These are two products I have been loving recently. I've been on the hunt for a good setting powder for a while, I did really like my Mac Prep + Prime Translucent Setting Powder but it shows up with a flash and looked like I had white smudges underneath my eyes and anywhere I'd applied it heavily.

That powder claimed to be translucent which it was to the naked eye, but it was a bright white powder in the packaging. This LM one is a pale yellow colour, so it gives a much more natural finish and holds concealer in place extremely well. The yellow-tint even helps with darkness under the eye which is a plus. I've been using this to set all my foundations especially my Mac Face and Body, which is water-based, and it helps it to stay on all day. 

The Laura Mercier Translucent Setting Powder retails at £29.00.


The LM primer is also a lovely find that I bought on a whim while I was at the LM counter. I've been wanting a good primer for a while and although I do like the Benefit Porefessional Primer, it's full of silicone and sometimes feels weird and heavy on my skin (plus paying all that money for some silicone?? Anyway....) 

What I like about this primer is that it feels like you are putting the most luxurious moisturiser on your skin, it feels silky and just like a moisturiser, not like silicone at all.

I simply spread a layer of this over my face before foundation or mix it with my foundation and it really helps it to last longer for a night out or a hot day. It smells lovely too!

"But it's Laura Mercier so it's going to be expensive" you say, well...

The Laura Mercier Oil-Free Primer retails at £28.00 for 50ml

where as

The Benefit Porefessional Primer retails at £23.50 for a measly 22ml.

You do the math ;-)

-

I really recommend this primer if you have combination/oily skin or find make-up doesn't last well on your skin throughout the day or night. You only need a small amount, so 50ml will last you ages even if you use it daily.

You can purchase both products from department stores such as House of Fraser and Selfridges and can order them online from either of their websites!

Review: Estée Lauder Double Wear Zero Smudge Liquid Eyeliner


I picked up this Estée  Lauder Double Wear Eyeliner about a month ago, and although I haven't used it religiously, I've really been enjoying it.

Like most girls I think a good liquid eyeliner that actually stays in place all day is hard to come by, but this one really does do just that.

It was so hard to get a good photo of that pesky shiny packaging!

I never used to like long wands on my liquid eyeliners, but this one is really easy to use and I can't fault the design of the brush. The brush is fairly sturdy, but it has a very fine point, something that my L'Oreal Super Liner Carbon Gloss doesn't have. The fine point means it's super easy to get that 'cat-eye' look and you can draw the line fairly thin all the way up to fairly thick.


The pigmentation of the liner is very, very black and you only need one line (going over in some areas) to get a completely opaque line. I've only used this for my upper lash line, but I don't see why this wouldn't be great for the lower lash line also if you like that intense look.


Here's me wearing the Estée Lauder Double Wear Zero Smudge Eyeliner in 01 Black on one eye.

I am also wearing Chanel Vitalumiere Foundation in B50,  Mac Moisture Cover Concealer in NC35, Clinique Airbrush Concealer in Medium 3, Illamasqua Brow Cake in Thunder, Max Factor False Lash Effect Mascara and Nars Lipgloss in Turkish Delight.


-

I really love this eyeliner and it's my 'go-to' if I want that Lauren Conrad polished cat-eye look. It's the first Estée Lauder product that I have tried and it's only spurred me on to try more of their products!

You can get the Estée Lauder Double Wear Zero Smudge Eyeliner from esteelauder.co.uk and it comes in Black, Brown, Graphite and Bronze. I think the Brown would be great for a Marilyn Monroe look!

Hope you enjoyed the review!


Vogue Bit #2 - Trends from the Catwalk A/W12


Hello!

This weeks 'Vogue Bit' is a bit of fashion, something a bit different and I've really enjoyed putting this post together.


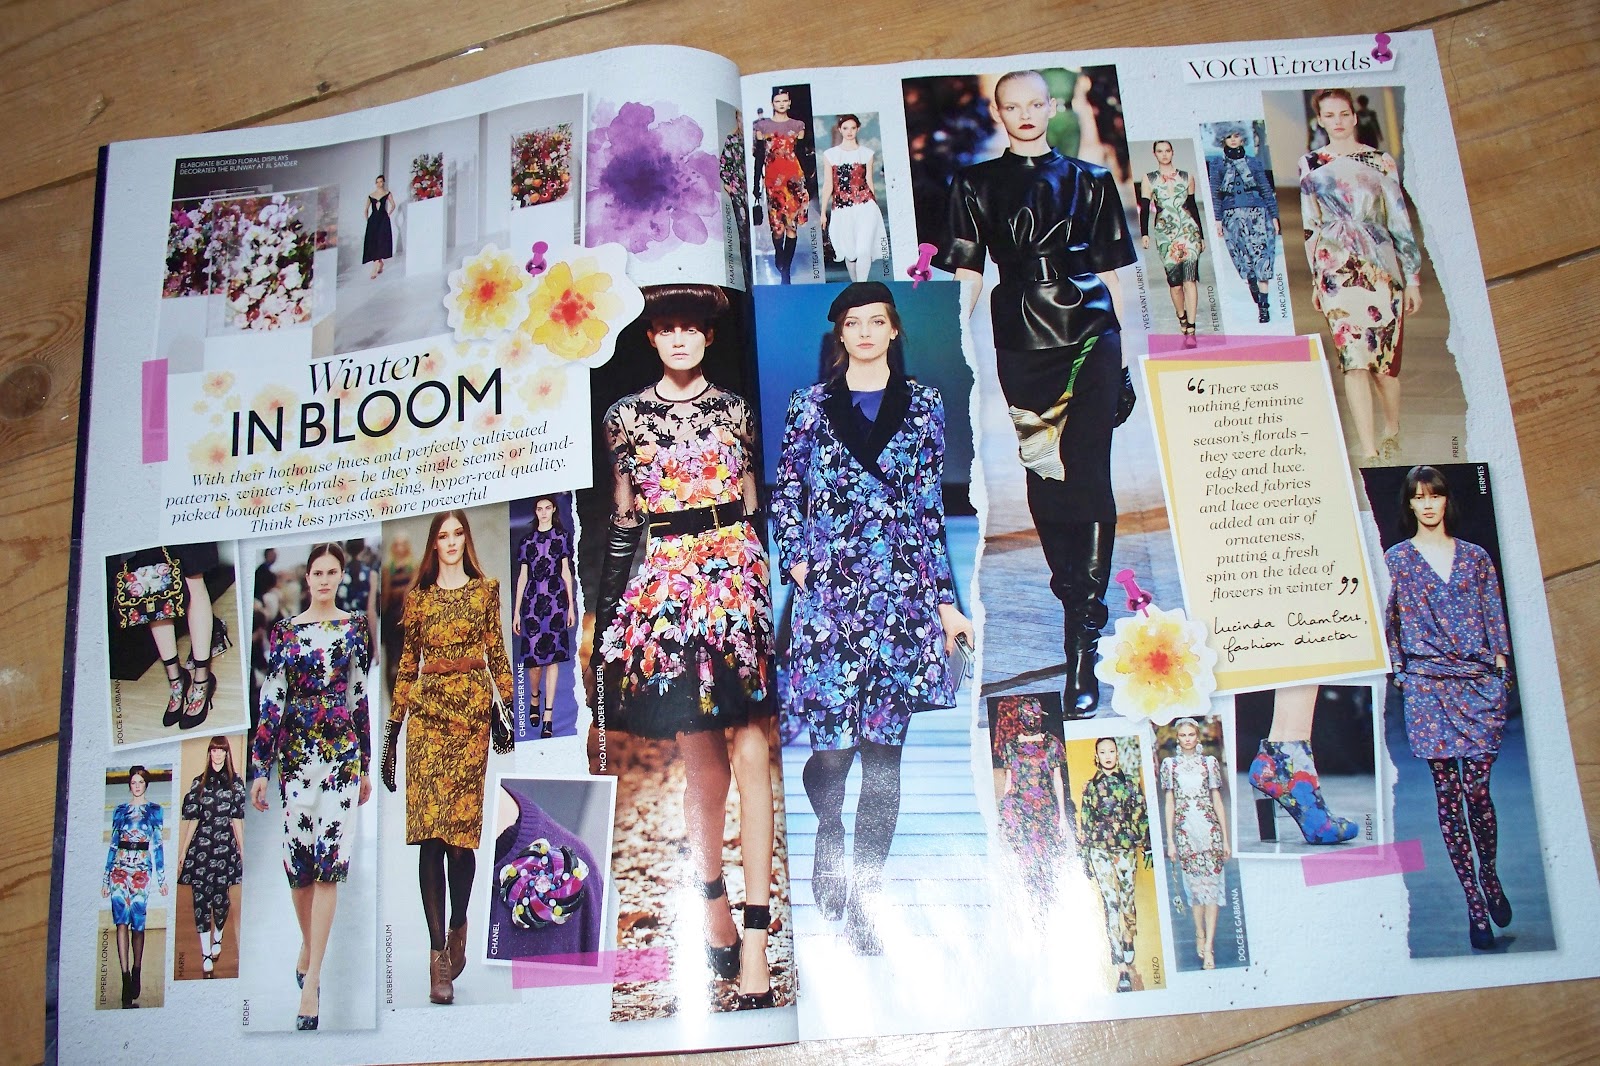
I was reading the mini-magazine that comes with some issues of Vogue, (I always love reading them as they really encapsulate what trends are going to be coming forward in the next season and gives you a great insight on what pieces to look out for) and I suddenly thought "I have to post about this!".

This is quite a random idea/concept, but I quite like it and I think it works well for a post - so please let me know what you think! There were lots of things and pages in the booklet that really made me go "wow, I love that!, so I just started to take snaps of the pages that stood out to me the most. Kind of like collaging or "tumblr-ing" if you will, just me sharing things that I am liking and that inspire me. The pages I have photographed are some looks that I think will look really great for this Autumn/Winter, and most aren't the usual sort of colour schemes or looks you would expect from an end of year trend prediction.

There are plenty of colours, patterns, prints and really unique cuts and styles. After looking at the photo's I was inspired to research/have a look around the internet to further develop this sort of fashion collage, I found some bits and bobs that reminded me of these styles and trends. I really hope you like what I have put together!


Winter in Bloom


Winter?! Just look at those prints! I just loved this page when I saw it as I am a big big fan on prints and patterns. I just love bright, fibrant florals and deeper toned florals and teaming them with a bit of leather or pvc really roughs it up and creates a girly/edgy look.


This gorgeous floral maxi really reminded me of this trend, I love a good maxi dress and this seems great for Autumn/Winter teamed with some chelsea boots or ankle boots with a statement cuff.


I had to get a close-up of the print - the colours in there are beautiful and pastel but bright too. I am definitely going to try and get my hands on this for after Summer as I think it is a really lovely piece.

You can purchase this dress at Topshop for £59.00.

The Rise of Oversize


The first thing I thought of when I saw these oversized looks was Cos, a lovely brand who do really chic, plain and simple clothing - their motto being 'Timeless Modern Tactile Functional'. The working woman's easily wearable but chic option at quite a reasonable price. 

I went to a Cos store about a month ago and a lot of their cuts are very straight and their sizes and styles are quite oversized. 

I quite like this oversized look because it's so easy to wear. You could team this with tights and heels for work or with black leggings and pumps for a dressed down day. Black is such an easy and flattering colour to wear, but just be sure you don't go too oversized or you may loose yourself inside the clothes!!


This oversized wool dress is from Cos and is £69.00.


These patterns are really bold and make me think 70's....


....as does this Zara top and trousers combo. (I thought this was a playsuit, but you actually buy top and bottom half separate!) This initially looked purple to me on the site but when you zoom in you can see the pattern and the blues, whites and reds that give it such a great violet hue from far away.


This again is something else that could be dressed down or up with ballet flats or some courts and really reminded me of that 70's-esque page that caught my eye in Vogue.

You can pick up the shirt for £39.99 and the trousers for £35.99 both from Zara.


A/W Brights
It's so nice to see that bright colours are still on trend for A/W, who says that just because the weather changes we all have to dress drab??

The fuchsia and yellow in this photo really caught my eye, along with that bright red fur coat. The furs and the colours look great together, how I would love to walk around London on a drab, cloudy day in a fuchsia and black fur throw!


This canary yellow sleevless top from Reiss would look really great with a simple pair of black jeans and some nude pumps, add a jacket and your good to go for Autumn.


Just look at that orange! I love this colour, and would definitely wear this on a night out for dinner or drinks no matter what the season, I also think a fur would look great with this one as its a simple cut.

You can get the yellow sleeveless top from Reiss for £95.00 (the website says it is 'Lime', but that looks like a yellow to me!)

and you can find the orange shift dress at Topshop for £80.00.


The New Opulence

This is probably my favourite trend, really lavish and extravagant looking. I love anything gold and the gold detailing on that black coat below is just to die for.


This style really reminded me of current Louis Vuitton I have seen in around in magazines, particularly Vogue. The embellishments and velvets really make their clothing look luxe and their ad campaigns are always playful and chic.

Louis Vuitton A/W '12

Louis Vuitton A/W '12
I can imagine these outfits being in a chic, fashion forward remake-remake of Charlie and the Chocolate Factory, no? :-)

Louis Vuitton A/W '12
The main thing that this Opulence trend reminds me of is the Givenchy x Watch the Throne collaboration. 

Interestingly, the actual album cover was designed by Givenchy's creative director Riccardo Tisci. The cover was designed to look 'embroidered' and 'embossed'. The deluxe edition was a metal casing with this design embossed into it. The cover shows a lot of symmetry in it's patterns and looks regal.

I love the gold, it just looks incredible and I'm yet to see an album cover like it. I think Tisci did a fantastic job on designing the shapes and the concept, and if you haven't yet heard the album I do really recommend it!

I think this album cover is extremely iconic and symbolises the generation it's from, definitely fitting for the Opulence trend.

The Album Artwork for 'Watch the Throne' by Jay Z and Kanye West (A.k.a 'The Throne')

The Inside Poster


Decorative Heels
And last but not least, these wacky, wacky heels! These multi-coloured, multi-patterened heels really remind me of Japanese fashion, they are so quirky and really unique. 

With embellishments and pattern, the trends I have spoken about show a lot of texture and complexity which I am a big fan of.


Just look at these tartan Loubs! With a plain, understated outfit these Louboutins would really give it some oomph and definitely turn heads.

Looking at these shoes makes me want to be a bit braver with my shoe choices, I have gone as far as glitter, but I think it may take a while for me to get used to the idea of wearing tartan on my feet, let alone my body!!

You can pick up these Bibi 140 tartan pumps from Net-a-Porter.com for £495.00.

-

So thats Vogue Bit #2, I do hope you enjoyed it! Please let me know what you thought and if you think I should do another post like this in the future!